Although many people find wireless to be simpler, I really wanted to use a hard wired option for home networking because of multimedia sharing, capacity on my network, and my mild wireless security concerns.
With a wired network, I can have a private, fast network at home for Internet access, file sharing, media streaming, online gaming (on a console or PC), IP security cameras, or any other application requiring conventional ethernet type wiring.
Let’s start thinking about and planning now!
Initial thought and planning of the network cabling
Based on your needs, there are several design issues that need to be resolved. Since these questions will have an impact on the amounts, tools, and materials required, I’ll talk about them before the materials.
1. Which room/s do I want wired ethernet?
I have a 4 bedroom home so I knew I wanted all bedrooms wired. I also have a media center below where my smart TV is. That seemed like a good location to wire as well for things like video game consoles. I have smart TVs in each of these locations, so it seemed logical to install network cabling in all the bedrooms below the TV.
2. How many ethernet port locations do I want?
I knew I needed at least three connections behind my TV because I have many game consoles and a Blu-ray player that can connect to the internet. I simply chose 4 because the wall plates are available in combinations for 1, 2, 4, and 6 jacks (for a single gang). Why run one cable when running four is almost as simple? To provide the most flexibility without the requirement for local (in-room) network switches, I simply ran 4 drops to each place rather than varying the amount. 16 ports altogether, 4 locations with 4 ports each.
3. Where would be a suitable place for the network distribution?
For me, my laundry room was the obvious choice. This room already has access to my internet. The fact that my internet connection enters my home (by cable) from this location means that, if I transfer my cable modem here, it will be able to provide internet access to the entire network. The amount of room required to mount a shelf to hold the network equipment is another factor to take into account.
4. What path should the network cables take?
This is probably the most difficult consideration. For me, my house is single story home and I have access to my attic. My cable internet comes through the attic so it seemed like a good solution to run my home network through there as well. For single floor homes with a basement, the basement may be the best path.
For multi-story homes you may have to be creative. Outside may be an option by running conduit on the outside of the home to keep it insulated. The other consideration with cable path is cable length. The max cable length for up to gigabit speeds over copper UTP cabling is 100 meters (~300 feet). This should provide plenty of flexibility for most home applications but it is good to be aware of this limit.
5. What network speed do I need?
This will primarily influence the type of switch to purchase. In most homes, gigabyte internet is starting to become the norm. For any network installation, a gigabyte switch is my top recommendation. A 100 mbps switch is adequate if you are merely running wires for security cameras. Use a 1 GB switch if you intend to connect any additional lines to the security cameras. Amazon is where you may get a reliable network switch.
For households, my favorite brand is TP-Link. Regarding cabling, CAT6 cable, which has become the new standard for any updates or new installations, has become more affordable over time. In 5 years, you won’t regret it. Employ CAT6 cable! Trust me on me for this. 10 gigabit internet is going to arrive, and you will need CAT6 Cabling for it.
Now, network supplies and equipment!
Step 2: Required Equipment and Supplies (and Costs)
Network Tools Needed:
- Tool for crimping Ethernet cables (only if you’re adding plugs to the ends): You can order a decent set of ethernet crimpers for about $29 from amazon. You can also get the same set of ethernet crimpers at Home Depot (Here is a good set of crimpers) FYI: Real Nerds ought to own one.
- Power Drill (primarily for drilling through wall top plates, but makes screwing faster too): I personally already had one (since i do this for a living), but if your wanting a good one without breaking the bank, Walmart’s Hart Power tools are actually really good. They are better the some brands at the hardware stores. You can get one for about $40. (Here’s a link for the drill)
- Paddle Bit (The size of the paddle bit or hole saw depends on how many cables you’re running): You can get a set of paddle bits for $10-$20 dollars. Remember, with drill bits you get what you pay for.
- Drywall Saw: You will need this to cut holes for the wall plates and gang boxes. (Here’s a link)
- Fish Tape: You can get this on amazon for about $15-$20. (Here’s a link)
- Label Maker: (optional)
Network Cable Materials
- 1000′ spool Cat-6 (more or less based on your need): $200
- Single Gang Retrofit Boxes (the kind that clamp to the drywall, open back): $3.00 each
- RJ-45 Jacks and plates (get what you need, maybe an extra or two) $1 plate, 16 keystone Jacks at $4
- RJ-45 plugs (optional):
- Patch panel (optional, another professional touch): $60
- Ethernet Switch: You can get one for about $100 depending on how many cables your running
- Router/Firewall (optional)
- Velcro strips for cable management (optional): $11 for a roll
- Short patch cables (optional): About 2 dollars a piece
- Punchdown tool (optional): If your using keystone jacks for the cable. You can get one for about $20
- Cable tester (to test each drop): $20 You can get one on amazon for a good price. Sometimes, ethernet crimpers will come with a tester. So check that!
Now that we’ve (hopefully) got all the stuff we need, lets mount the wall plates!
Step 3: Network Wall Plate Mounting
1) I started by finding my cable TV jacks because I already knew the route my cable TV took. They were all in the same places as where I wanted my ethernet jacks to be. I was able to determine which side of the cable jack the stud was on using the stud finder. Nearly all homes have studs that are 16″ apart, so I knew I wanted my ethernet to fit in the same wall cavity as the cable TV.
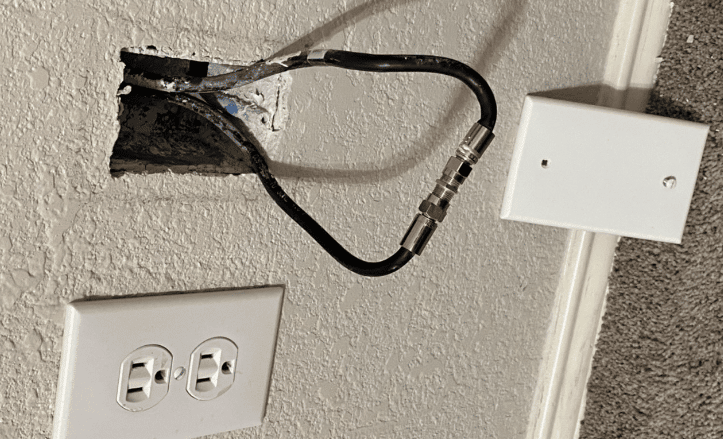
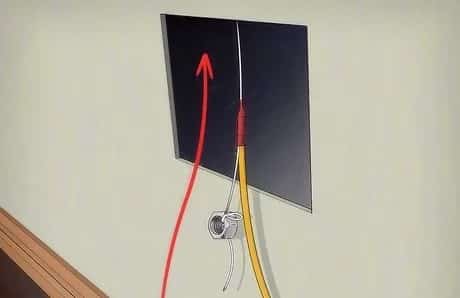
Note: Sometimes, cabling installers from the internet provider you have, will just drill a hole from outside of your home (Like pictured below), into the wall, then cover it with a wall plate. It will have the appearance of being a cable outlet, but isn’t. Very frustrating right?
In this case, if its an exterior wall, I would look at other options to install ethernet cable. I recommend finding an interior wall, where it is easier to install your ethernet cable from the attic.
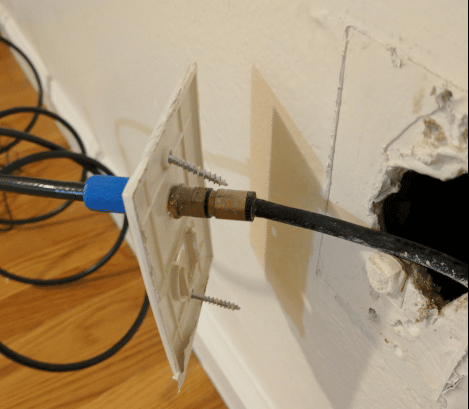
If they did in fact fish it from the attic space, but didn’t install an outlet box, easy fix! You can just use the cable as a pull string ( If your not wanting the cable anymore), cut in a new outlet box, then get your ethernet cable installed. (More on that later)
2) You must now draw the lines on the wall to accommodate the new box. Cutout the box with the pointed hand saw after deciding where to mount the box. You shouldn’t need to drill starter holes, the pointed saw should be able to cut through the dry wall quite simply.
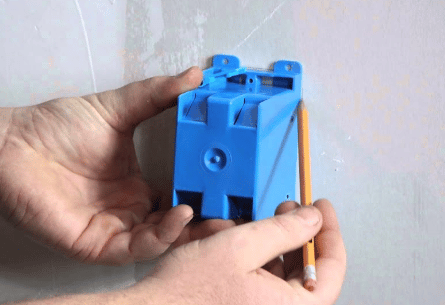
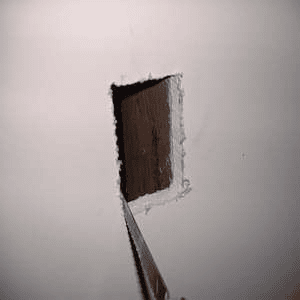
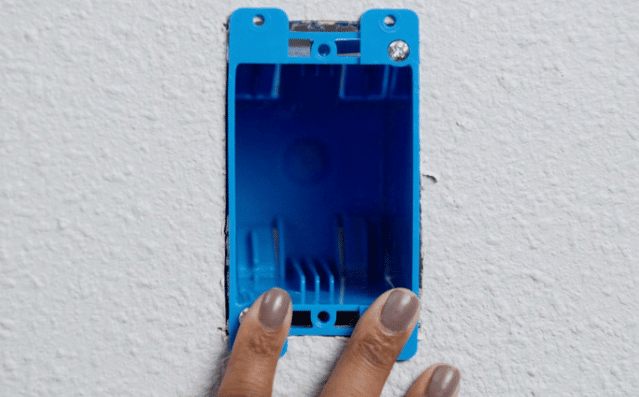
3) Once the hole has been made in the wall, the single gang box may be inserted into the opening and secured with clamps to the dry wall’s back. For each location you want to run to, repeat these steps. We won’t install the data wall plates just yet.
Additionally, you should really cut a hole in the distribution room’s wall. You need to make a outlet here for the all the cables coming to the network switch and router. If you already have a media panel installed for your home network, you can just skip this step and fish them down into the media panel.
We can now run ethernet cables!
Step 4: Running the Ethernet Cables and Measuring
There are various methods for doing this, including estimation, measuring from floor plans, conducting one ethernet cable run, etc. I applied the run-one technique.
I ran one cable from the distribution room to each room, took it out, and built three more cables identical to it in order to determine the lengths needed for each run. You can then run all four at once. Additionally, you should use a sharpie to designate both ends of each cable. The ports on both ends can be identified in this manner.
Installing Ethernet Cables in the Wall From The Attic
To drop the cables into the walls where you want the data outlets, you must first drill through the wall top plates. It can be challenging to locate the ideal drilling location in the top plate so that the 16″ spacing between the studs is maintained. Here are a few methods for doing this.
Using existing coax cables as locators or pull strings.
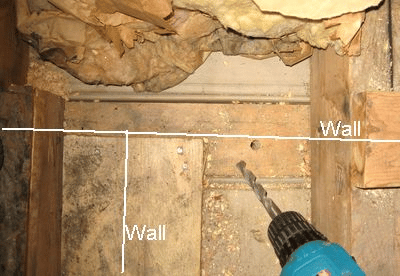
Option 1: For this installation, I’ll be using coax cables for cable TV to identify the locations. After following the cable TV through the attic, I drilled new holes in the top plate just next to the existing ones that were used for the cable TV.
Option 2: If your planning on not using the coax cables anymore, you can tape your ethernet cables to the existing coax cables. Once you tape the ethernet cable, pull the cable through the attic space. (Note: Many homes come with coax that was installed during construction. Sometimes they staple them to the 2X4 in the wall. This makes it impossible to use as a pull string. If this is the case, you will need to install your ethernet cabling as a new cable drop.)
For drilling your holes, you’ll need a strong drill and either a paddle bit or a hole saw. The paddle bit is less expensive, but the hole saw is simpler. I used a 1 1/4″ paddle bit, which proved challenging to handle and occasionally taxed the drill. Although this makes running the cables a little more difficult because you can’t tape the bundle together, you can also choose to drill several small holes and utilize one for each cable.
After drilling the top holes, you can string some ethernet cable to determine how much to cut for each run, cut three additional equal lengths for each run, and then re-run the cables. Make sure to make them long enough to have extra for incidents with crimping and stripping. Extra length may always be tucked into the wall with ease.
Now, lets make some connections.
Step 5: Ethernet Wiring Connections to the CAT6 Patch Panel and Ethernet Jacks
Now that the cables have been routed, we can plug them into the patch panel and jacks! A patch panel was not required, as stated earlier. You can take the ethernet cable from the wall, plug it into the switch with an RJ-45 connection, and leave it there. I believe mounting a patch panel is much more professional for permanent installation.
Wiring A Patch Panel
This is fairly simple. The majority of jacks and patch panels provide wire color schematics for the widespread T568A and T568B ethernet wiring standards. This is how data network installers keep consistency across the industry when wiring ethernet cables. If another network data installer goes to a business, they can expect that the wiring of the ethernet cable is of one of the standards.
Cable jackets on incoming Ethernet cables should be removed.
The incoming Ethernet cables need to have their cable jackets removed, and wire strippers work best for this. Cut the jacket off the cable by about 1.5 inches, then take it off and throw it away. Hardware and electrical supply businesses also sell wire strippers.
Take away the interior plastic coats on the CAT6 Cable
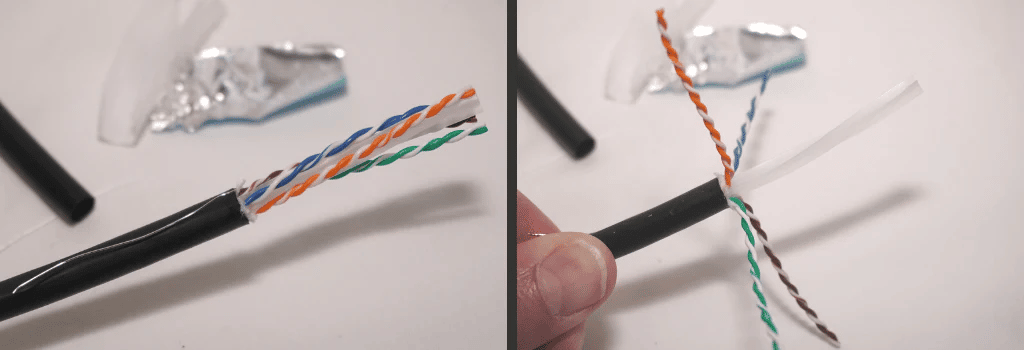
CAT6 cables have a internal plastic jacket that needs to be removed. For this task, use wire cutters and proceed with extreme caution. For the use of Cat5e incoming cables, however, exempts you from having to perform this step.
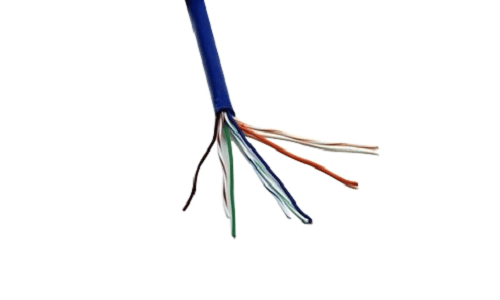
Untwist and spread the CAT6 cable wires
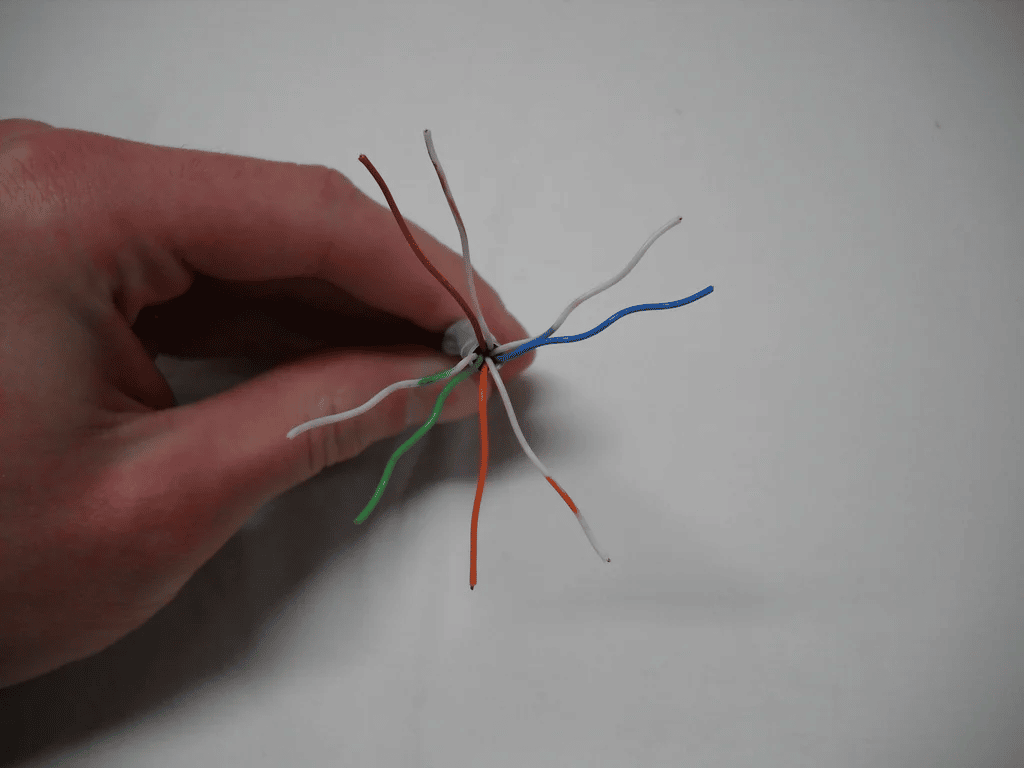
There are four pairs of twisted wires inside the Ethernet cables. Do not mix up these wires when you unwind them. The remaining wires have a white stripe next to the solid color on all but four of them.
Set your wires to the back of the CAT6 Patch Panel
The patch panel should then be connected to each of the wires. You should be able to choose the type of wire that goes to a specific connector using the labels with color codes that are attached to the connector pins.
Punch Down Your CAT6 cable into the Patch Panel
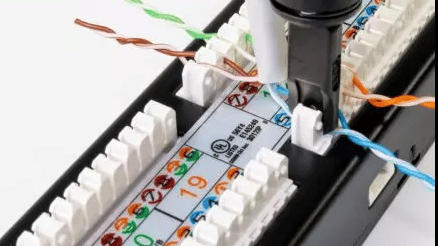
Each wire should be firmly pressed down using a patch panel punch down tool. This guarantees that the insulation connector teeth will hold the wire in position. To trim any surplus wire from the cut end of your Ethernet cables while pressing, place this tool’s cutting edge over the cut end of the cable. On the other hand, if it doesn’t have a cutting edge, use your wire cutter to trim back the extra wires that have strayed beyond the connector’s edges.
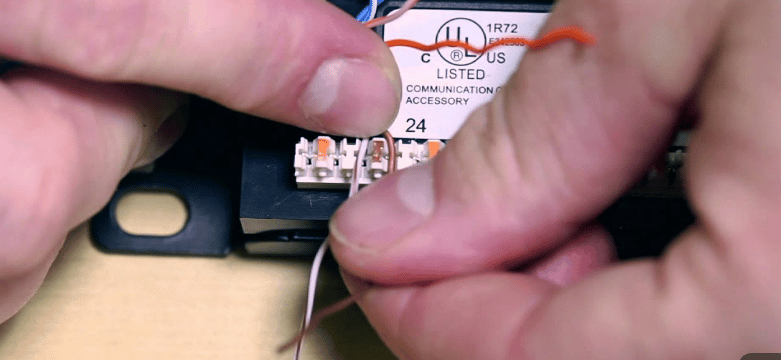
Wiring a Ethernet Keystone Jack
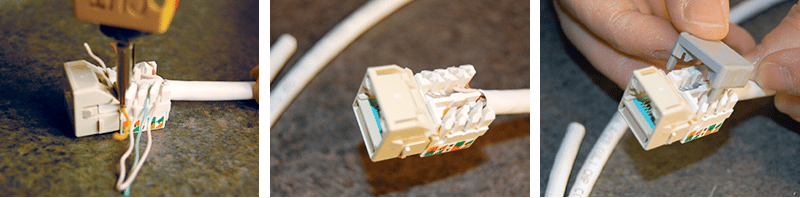
Wiring the keystone jacks is essentially the same procedure. For each ethernet jack, ensure you use the same wiring standard as you did at the patch panel, otherwise you will get crossed connections which will cause major issues on your data network.
The patch panel can be mounted to the wall once all the cables are attached, and the other ends’ jacks can then be inserted into the corresponding wall plates. The wall plates can also be screwed into the gang boxes.
Step 6: Test Your Connections
It’s time to test the ethernet wires after you’ve pulled and connected every one of them. There are now two ways to test a cable: either with a cable tester (which is recommended) or with a network device (notebook and network switch).
I powered on my switch after connecting a shorter patch cable from my patch panel to each port. I set each port to be “up/up” and “auto negotiate” because it is a controlled switch. Nothing will need to be configured for unmanaged switches.
Cable Tester
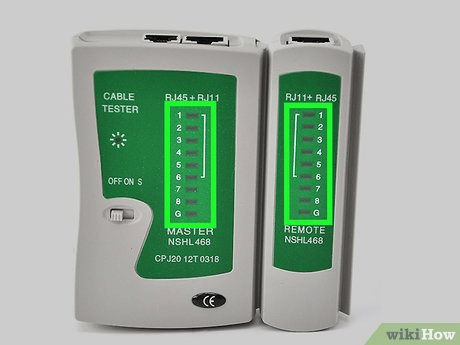
Each wire in the Ethernet cable will be examined using a cable tester. The best approach to determine whether your ethernet cables connect properly and are free of defects is to perform this test. On the cable tester, a light denotes each wire. You have a bad connection if the light doesn’t turn on. The best course of action is to remove the RJ45 or keystone jacket and terminate your connection again.
Laptop Network Connection
This is the longer way to do this, but needed if you don’t have a network cable tester. Plug a laptop and a different patch cable into each port in each room. After connecting each port, check the switch to make sure the “link” light is lit. The physical layer and data link layer must both pass the link-establishing test (i.e., there must be no crossed wires, no broken wires, and all tight crimps) (i.e. negotiation between network card and switch port). Nothing, not even IP addressing, is required for testing.
Make sure your labeling matches on both ends at this point as well. Using the patch panel as an example, you can confirm that “Bedroom Port 2” indeed connects to the second port in the bedroom.
Step 7: Connect your network to the Internet
Since I moved my cable modem into the main network area, I need to connect the coax cable to it. Once connected, there’s a few options. You can connect a single Ethernet cable from the cable modem, into the network switch in your network room. This is the simplest way. From there you can check internet through out your network.
If your setting up a mesh Wi-Fi network, and want to connect one of the Wi-Fi hubs at the main network area, I recommend connecting it directly to the modem. The reason for this is, if your network switch ever fails, your Wi-Fi will still stay online. Mesh Wi-Fi access points will default to bridge mode if internet is lost. This means they will connect wirelessly to the the mesh Wi-Fi hub in the network room. This works as internet backup in a sense and is convenient especially if you work from home.
Now your home or office network cabling is complete!
In conclusion, running the network cabling for your home isn’t very hard. The problem is, its very labor intensive and at times, you wish you would of signed up for that yoga class that was recommended to you. Hopefully this guide helped you understand what is needed and how to install your network cabling. If you have any questions, feel free to reach out! We are always more then happy to help where we can.
If you live in Texas, and feel like this project may be a little more than you bargained for, you can contact us. We provide network cabling installation and get get you a free estimate on your project. Thanks for reading!